Showing posts with label Nail Polish. Show all posts

Tuesday, February 14, 2012

DIY Valentine's Manicure

In honor of today's holiday, I figured a nail DIY was in order. I first tried out this one from Refinery 29 but could not get it to look even remotely decent and thought the contrast of red and white hearts would get noticed at work. I've noted a couple times my love for all of the metallics out in stores right now so I decided to channel that into a DIY foil mini-heart manicure.
Materials: pencil, small piece of foil, cuticle scissors, Essie's 'Marshmallow' and topcoat nail polish

Draw small hearts by hand on the least shiny side of the foil

Using cuticle scissors, cut out miniature hearts from foil and place 'dull' side down

Use the pencil or some other small pointed object to position the heart on freshly painted white nails and finish by adding a layer of top coat
Shameless plug: Did you vote for me in J. Brand's 'Style Showdown' contest yesterday? Did you know you can do it again (and again and again) today? Please remember to let me know if you voted so I know which Shanelé follower is in the running for the $300 gift card in the event that I do win. Thank you, thank you!

Friday, January 20, 2012

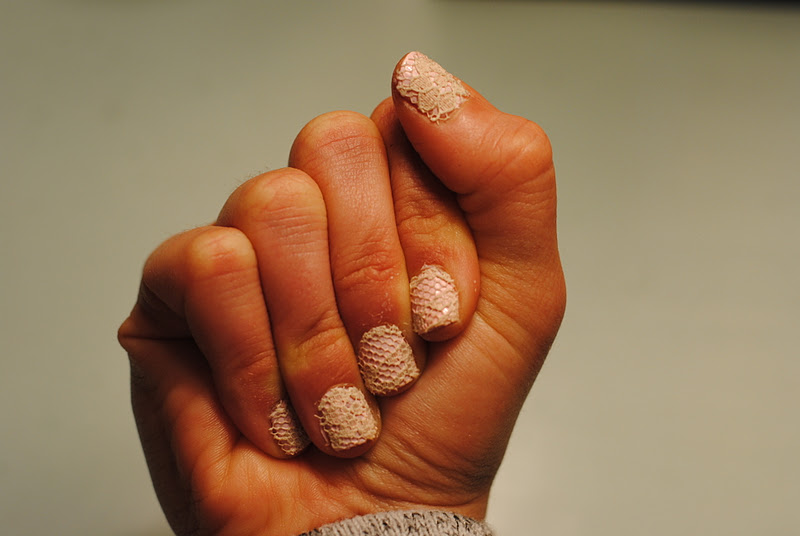
FriDIY: Lace Nails

If I haven't touched on it before, there is no better time than now to let you in on one thing. I'm a hoarder.  This little piece of lace is from my friend Vanessa's wedding invitiations. She got married June 2010. But I knew it was just too pretty to pitch and a short 1.5 years later, it came in handy. I had some down time during the Giants game last weekend so I cut it up into 10 small pieces for a little nail DIY.
Materials:
- Essie's 'Fiji' nail polish
- small piece of lace
- nail scissors
- clear top coat

{paint one coat of Essie's 'Fiji' or other color of your liking}
{cut lace into small pieces the width of your nail - I just eye-balled it and trimmed with nail scissors afterwards}
{apply another coat of polish, quickly place lace piece on top and press to secure. Allow lace to dry in polish and later apply two layers of top coat}

Wednesday, August 10, 2011

DIY Marble Manicure

The weather this weekend only allowed for an hour of sun time before the clouds moved in Saturday and stayed through a rainy Sunday. All this time indoors lead me to do a couple things I've been wanting to do for a while like start a Facebook page (which you can 'Like' here) and this DIY marble manicure I saw on Refinery 29. Unfortunately I was only able to wear it for a couple days before heading back to The Cube because I would imagine pink/yellow/green swirled nails infringe upon the business casual dress code...unless you work for Lisa Frank, that is.  If nothing else, it makes for a fun rainy day activity. 
Good luck!
Shanelé
Materials:
- Cup of warm water (it will get ruined so I recommend plastic)
- Toothpick
- White nail polish like Essie's 'Marshmallow'
- Three other colors of nail polish of your choosing.
   I used Essie's 'Mint Candy Apple,' American Apparel's 'Butter' and OPI's 'I'm India Mood'
- Scotch tape
Step 1: Tape off fingers {one strip around the base of nail and one over the finger as pictured} and paint them white to provide a base for the colors to stick.
Step 2: Start dropping alternating droplets of nail polish in the middle of the water. It is important that the water is warm so the colors can spread. I also found that it helps to start with your most vibrant polish, in this case the pink, so it's easier to see the first circle. 
Step 3: For cleaner lines like in the first photo, leave the nail polish as pictured above. For a more 'tie-dyed' look, like in the last photo, use toothpick to make a large * in the middle of polish 'bullseye'. This gets tricky because you have to move quickly before the polish starts drying/clumping (hence no photo of this stage).
Step 4: Put the top of the nail directly in the center of the nail polish bullseye and push all the way down to the bottom of the cup. Let sit for ~1 second and pull out of water. Once dry, remove scotch tape. Your hands will be a little messy but you can use nail polish remover or soap & water to remove excess polish. Some nails may take a couple tries to get the desired look but that's part of the fun!


Wednesday, June 1, 2011

Walk around the Winery

Dress, sandals - Forever 21
Sunglasses, belt, flower pin, bag, bracelets - H&M
Nails - Essie's 'Mint Candy Apple'


As pictured in yesterday's Weekend Update post and a couple months back in Miami [figured I could post again given my rouge skin in March's post makes for a completely different look], this floral maxi treated me well on an overcast Saturday in the Hamptons. I am hopeful that the Memorial Day reminiscing will soon stop, allowing me to actually focus at work today....but not placing any bets.

xx,
Shanelé
Related Posts Plugin for WordPress, Blogger...